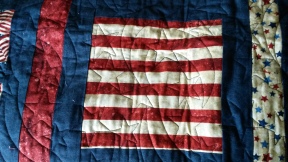
Red, white and blue quilt

For a very long time we have had a store bought quilt on our bed and I wanted to make a new one, but I wasn’t sure what colors or design to make it.

In 2016, at the summer picnic meeting of the local Quilt Guild, I won a stack of 2.5″ strips of patriotic material.  When I brought them home I wasn’t sure what I was going to do with them since I don’t really care of the look of Jelly Roll quilts.  Then I realized most of them were similar to the colors of our current bed quilt.

I then went searching online and found that some of the material was from the Stonehenge Stars and Stripes fabric line.  I found out that there were 10″x10″ squares, 2.5″ strip sets and yardage available in the same fabrics and I could also find some of it in the local quilt shops.

The next steps was designing the quilt top and figuring out how much fabric I would need.  Oh, and I don’t think I stated that I needed to make a slightly oversized quilt for a California King bed.  Until you start measuring the size and sewing the quilt top together you don’t realize how big that is!

I realized if I ever wanted this quilt finished then I had to make a simple design and use as much of the precut 10″x10″ squares and 2.5″ strips as possible.  Once I had a few designs figured out I showed them to my husband.  I had a plain piece of blue laid between the two different designs to separate them, but he actually liked it best with the plain blue strip in the quilt.  So, the final quilt is a mixture of the two different designed I originally came up with.

After cutting, sewing and trimming down to size for what felt like forever the quilt top was done.  Then I wanted to use up as much as possible of the extra 10″x10″ squares and left over material so I decided to make a design for the back of the quilt too.

When it was all done I handed it off to Quilt Legacy in Dayton, NV to long arm quilt  since I had other projects I needed to work on and I knew it was going to be a major pain to quilt that size quilt on my domestic sewing machine.

I am very impressed with how the final product turned out.  The quilt pattern they used was perfect for the quilt top.  And my husband was very happy with the finished quilt.


As I stated, when I showed it during Show & Tell at the local Quilt Guild, I don’t quilt that often, but when I do I take on BIG projects.

From some of the matching yardage I also made two pillow shams.

What big project have you tackled lately?

Heather


Custom aprons

This winter I made custom aprons for two little girls I know.

One was a birthday present for Mia who was turning  two year old.  Her mom told me that Mia loved the movie ‘Frozen’ and I happened to find some perfect fabric.

Mia apron


Then I told my hairdresser and she said her three year old would love an apron too.  So, I found some more material and I made her one also.

second apron p

They were pretty easy to make and I was happy to hear that both little girls enjoyed them.

Later – H


Curtains made with Grommets

Note:  This is not a sponsored post.  I bought all of the material and the opinions are 100% mine.

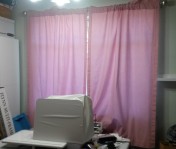
When I started to setup the sewing/craft room I used a set of pink curtains I found in the garage.  Since I had painted the room a light green color the curtains gave a horrible tint to the room, but they at least covered the windows until I found a set of curtains I liked.

pink curtain

Temporary curtains

I didn’t find a set of curtains I liked, but I did see this package of Dritz Home Curtain Grommets, in Pewter, at a local fabric store.  I had never used them before and was willing to try.

grommets used

Dritz Home Curtain Grommets

Next, I had to find the material I wanted.  I happened to be in Walmart one day and saw this material for less than $3.00 per yard.  I bought four yards of the main material and four yards of the white material as the liner.

main material

Since I had never used the curtain grommets before I decided to cut a header and attach the grommets to it and then sew the header to the curtain.  I used a ruler and pen to mark the center of each grommet location and then used the pen to trace the template mark.

Note:  I also decided to stitch the two layers together on the template line so the curtain would not move while I was cutting out the circle.  This step wasn’t mentioned on the package or by the fabric store.

stitch on template

To cut out the circle I made a small cut in the middle and then worked my way out to the outer edge.  The cashier suggested that I cut the hole slightly inside the template mark which was a very good idea.

cutting circle

I followed the package instructions to install the grommets.

white header

To make sure that the edges of the curtains didn’t roll I top sewed about 1/4″ from the edge of the curtains after I had pinned and ironed the edge flat.

edge stitching

When the curtains were done I hung them up and found out that they were not as full as I wanted.

white curtain

Finished white curtains

So, I went back to Walmart and found that they were out of the white material, but I found a black material with the same pattern on clearance also.

black material

So, I bought a third package of the Dritz Home Curtain Grommet and made two curtains, which were half width that I hung on each side.

black and white curtain

Final curtains

I think they turned out really good and I would definitely make more of these curtains.

Some additional information:

– I saw similar packages of the curtain grommets at Walmart.  I think they were for a slightly different size curtain rod and I don’t know if they go together as easy as the Dritz Home package.

– I recently saw similar curtain grommets used to make a tote bag.  She used them as decoration and for the handles to go through.

– I used quilt weight material so I didn’t have to worry about the two layers of material being too thick for the curtain grommets.

– The package of curtain grommets says that the grommets can be removed with a flat screwdriver and that the curtain grommets should not be put through a washing machine, which is another reason I sewed the two layers of material together.

Leave a comment if you have any questions.

What project have you worked on lately?

Later – H


One of my favorite blogs #1

I saw that another blog posted about one of their favorite blogs recently and realized I would like to start doing it also.

So, I only started following blogs a few years ago.   One of the first blogs I found was  ‘While Wearing Heels’   http://whilewearingheels.blogspot.com/

I wasn’t even sure what post first caught my attention so I just went looking on her blog to figure it out.  I think I first found one of Amy’s posts on Pinterest.com and was hooked from then on.

Some of the first ones that I pinned:

a) Framed postcards – I have been sending the daughter / us postcards from vacations for years.  I usually put the postcard in the scrapbook (using removable photo ‘ears’ so we can take it out and read the back), but I loved the idea of actually framing the writing on the postcard and an associated photo.

http://whilewearingheels.blogspot.com/2013/04/frame-personalized-postcard-souvenirs.html

b) United Scraps of America – I love this idea, but I plan on making it special for us.  I want to make a wall hanging and fill in the states as they are visited.  There are many that would be filled in right away between traveling for work and for fun, but it would be fun to figure out which states are still on our ‘bucket list’ (and to figure out if we can find  a reason to visit those states).

http://whilewearingheels.blogspot.com/2012/09/united-scraps-of-america-grand-finale.html

c) Steampunk Art – I thought this idea was so cool and when the Father-In-Law was selling old pieces of tractors, etc I saw piece that would be perfect.  I still have the piece and need to get it finished so I can get it displayed.

http://whilewearingheels.blogspot.com/2012/03/switching-gears-steampunk-art.html

So, what are some of your favorite blogs?

Later – H

Happy Father’s day and Subway art

First I want to wish all the Fathers a Happy Father’s Day!   We hope to spend the day going to church, going out to lunch and then spending the afternoon with Pepper (the Golden Retriever) and family – either hiking or taking her swimming

So, for a present I decided I wanted to make the husband a Subway Art using some of words of his favorite things.  First I was looking at making a Canvas Artwork, but ran into problems getting the words to fit correctly on PicMonkey ( http://www.picmonkey.com/  ).  I use this site to add the Watermark (blog name) to the photos I own and post.

So, then I started doing some Google searching to figure out how else I could make a Subway art.  I found a few references to Wordle ( http://www.wordle.net/ ).  It is a pretty easy site to use (I do suggest you read their FAQs before you start out).  I did save my word list in a document first so it was pretty easy to modify.

I was able to make and print out my personalized Subway art (in black and white) this morning – now I need to put it into a frame so I can give it to him.

Sorry for no pictures this time, but they are currently in the new phone (which I have to figure out to get them posted).  I figured it was better to send out the idea now in case you wanted to make one and post photos next week.

And you add a comment if you get this?  I tried to email a couple of posts to myself to I could forward them to a friend and I realized I never got them.  Not sure if it is our email account with the problem or if the posts are hiding from people.  thanks!

Later – H

Thumbprint Wedding guest sign

One of the presents we did for Chris and Naomi’s wedding was a Thumbprint sign.  I had seen similar ideas on Pinterest (yes, one of my favorite places on the internet), but the niece asked for a custom ‘Up House’ (with thumbprint ‘balloons’ lifting off the house).  So, the daughter helped create the Up House board.

At the wedding we used permanent Ink and tried to suggest that people put their thumbprints in the general area that the balloons would be.  Well, as you can see from the end result that didn’t always happen (I know most of the stray balloons happened after we were manning the guest signature / thumbprint table).

After the wedding we brought the sign back home and the daughter used my scrapbooking chalk to make the faint extra balloons.  When it was all done I think it turned out great.  Now the happy couple have an art piece to remind them of their special day.

wedding, thumbprint, custom

Some hints if you decide to do one of these:

a) Make sure you use permanent ink (for the thumbprints and for the drawing)

b) Have baby wipes handy to get the ink off the guest’s hands (that was an after thought, but I am so glad I brought them)

c) Use blank paper, etc to block off the areas of the board you don’t want people to mark with their thumbs

What do you think?

Later – H