Curtains made with Grommets

Note:  This is not a sponsored post.  I bought all of the material and the opinions are 100% mine.

When I started to setup the sewing/craft room I used a set of pink curtains I found in the garage.  Since I had painted the room a light green color the curtains gave a horrible tint to the room, but they at least covered the windows until I found a set of curtains I liked.
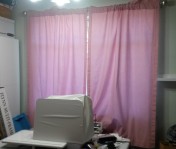
pink curtain

Temporary curtains

I didn’t find a set of curtains I liked, but I did see this package of Dritz Home Curtain Grommets, in Pewter, at a local fabric store.  I had never used them before and was willing to try.

grommets used

Dritz Home Curtain Grommets

Next, I had to find the material I wanted.  I happened to be in Walmart one day and saw this material for less than $3.00 per yard.  I bought four yards of the main material and four yards of the white material as the liner.

main material

Since I had never used the curtain grommets before I decided to cut a header and attach the grommets to it and then sew the header to the curtain.  I used a ruler and pen to mark the center of each grommet location and then used the pen to trace the template mark.

Note:  I also decided to stitch the two layers together on the template line so the curtain would not move while I was cutting out the circle.  This step wasn’t mentioned on the package or by the fabric store.

stitch on template

To cut out the circle I made a small cut in the middle and then worked my way out to the outer edge.  The cashier suggested that I cut the hole slightly inside the template mark which was a very good idea.

cutting circle

I followed the package instructions to install the grommets.

white header

To make sure that the edges of the curtains didn’t roll I top sewed about 1/4″ from the edge of the curtains after I had pinned and ironed the edge flat.

edge stitching

When the curtains were done I hung them up and found out that they were not as full as I wanted.

white curtain

Finished white curtains

So, I went back to Walmart and found that they were out of the white material, but I found a black material with the same pattern on clearance also.

black material

So, I bought a third package of the Dritz Home Curtain Grommet and made two curtains, which were half width that I hung on each side.

black and white curtain

Final curtains

I think they turned out really good and I would definitely make more of these curtains.

Some additional information:

– I saw similar packages of the curtain grommets at Walmart.  I think they were for a slightly different size curtain rod and I don’t know if they go together as easy as the Dritz Home package.

– I recently saw similar curtain grommets used to make a tote bag.  She used them as decoration and for the handles to go through.

– I used quilt weight material so I didn’t have to worry about the two layers of material being too thick for the curtain grommets.

– The package of curtain grommets says that the grommets can be removed with a flat screwdriver and that the curtain grommets should not be put through a washing machine, which is another reason I sewed the two layers of material together.

Leave a comment if you have any questions.

What project have you worked on lately?

Later – H


I unclogged the bathroom sink!

The bathroom sink has been running slow for a few months.  I had tried to pull out the hair, etc using the end of a chopstick (it worked to pull out some of it), but I didn’t think it had much hair, etc still down the drain.

The husband suggested I clear out under the sink (ugh) and we pull the stopper out so we could get it really clean.

Well, I got the area under the sink cleared out, but he didn’t have a chance to work on it.  So… I did a Google search on how to get the stopper out.

Here is the link I used (photo 3 shows how to get the stopper out).

http://www.familyhandyman.com/plumbing/drain-repair/unclog-a-bathroom-sink-without-chemicals/view-all

I was shocked by how much hair, etc that I pulled out of the drain.

bathroom sink junk combined

After I got all of above out I wiped down the drain with a paper towel and put the stopper back in.

To get the drain even cleaner I then put 1/2 cup baking soda over the drain.  I poured a warmed mixture of 1 cup vinegar + 1 cup water over the baking soda and closed the drain for about 30 minutes.  After that the drain appeared to drain quickly.

I guess I need to add this task to my To Do List (maybe every six months, if not sooner).

What household task have you learned to do recently?

Later – H

Word of 2015 – Simplify – #2

If you saw a previous post  ‘Specials Words of 2015’ then you know that one of them is Simplify.

Here is the second project that I did that has simplified an area of my life (which in this case is the corner cabinet in the laundry room).

corner cabinet

We use the corner cabinet as an extra pantry area, but it was difficult to keep track of what was stored in there.  For years (and I do mean YEARS) I had a piece of paper taped to the inside of the cabinet with a semi-running list of what was inside.  I knew there had to be a better way.

Last fall, I found a roll of cork sheeting (on Clearance after school started) and cut a piece to fit the inside of the door.  One problem was it didn’t like to lay flat and the second one was I realized I couldn’t nail it to the door, but tape and glue would not make it stay.  So, that came down and I still needed a solution.


A few weeks ago, Hand Husband asked if I needed anything from Amazon since he wanted me to order something for him (and then we would qualify for the free shipping).  That is when I remembered seeing the

Fancy-Fix A4 Sized Weekly Planner Blackboard Sticker Memo Removable Vinyl Chalkboard Wall Sticker   

and

SuperChalks White Liquid Chalk Marker Pen (4mm Regular Tip)

I realized the A4 size should fit (or would be easy to cut down) and I liked the idea of liquid chalk (I hate using regular chalk, especially in dry Nevada).

Once they arrived it took me about 5 minutes to have three of the Blackboard Stickers installed.  It was tricky to get the Liquid Chalk Marker Pen to work at first, but then it went on neatly and dried pretty quickly.

corner cabinet, pantry list, organization


I also found an idea for a Pantry inventory sheet at Organized Home   Pantry Inventory

that used boxes and ‘/’ to show you have the item and ‘x’ to show when it was used to keep track of the inventory.  I thought that idea was brilliant!   (go check out the free printable at http://Organizedhome.com )

So, I will be taking everything out of the cupboard and writing it down on the sheets when they go back in.  Hopefully then we will be able to keep track of everything.


Now, to figure out how to do something similar with the regular pantry (which has bi-fold doors)…

How do you keep track of your pantry inventory?

Later – H

Word of 2015 – Simplify – #1

If you saw a previous post  ‘Specials Words of 2015’ then you know that one of them is Simplify.

Here is the first project that I did that has simplified an area of my life (which in this case is in our hall closet).

Inside our hall closet we had two baskets (on the shelf above my head) which contain the winter gloves, winter scarves, winter hats, gloves, rain poncho, baseball caps, etc.  Also, the flashlight is kept on that shelf or the one above, which I can’t reach (have I stated that Handy Husband is taller than me and can reach a lot farther up than me?).

inside hall closet door


This last summer I added one Command hook to the inside of the hall closet for our summer hats since they would get buried in the baskets (along with the gloves, etc).


The other day I bought an over the door multiple shoe organizer, but didn’t want it to be ‘over the door’.  I also bought a package of Command hooks.

filled inside closet door


After I hung the multiple shoe organizer up I loaded it with the light items that we would use the most (including the small flashlight).

It is now so easy to grab a pair of winter gloves when I am pulling my coat out of the closet.

Where do you keep your winter gloves, etc?

Later – H

I fixed the dishwasher! (updated)

Update: I found out this morning that EveryAppliancePart.wordpress.com blog mentioned my post and linked to it.  Here it is if you want to see.

Dirty water in your dishwasher after the cycle? Clean out your air gap

Also, I realized I didn’t mention the YouTube video I had found so I added the link.  Note: I didn’t watch past the point where it stated what a ‘drain air gap’ was and that I needed to clean it out.

So, this morning I was being super productive – listening to the television, making Gluten Free Waffles (which I just realized I haven’t posted the recipe for yet, but I will), cooking bacon in the oven and emptying the dishwasher all at the same time.  Sounds pretty good, right?  Well, it would have been IF I had checked the bottom of the dishwasher before I emptied it and put the dishes away.

Note to self: Check the bottom of the dishwasher before emptying it.

dishwasher, drain air gap, repair


See, the dishwasher was filled with dirty water (and the amount in this photo was after I had scooped most of it out) – yuck!  So, now I had problems: not working dishwasher, a sink of dirty dishes AND I didn’t know which dishes sitting in the cupboards had just come out of the dishwasher!

So, I pulled out the dishwasher booklet and saw a note about cleaning the ‘drain air gap’ – I didn’t even know what that was or where it was.  Do you know what it is??

drain air gap, dishwasher, repair


So, I did a Google search which brought up a YouTube video.  I was surprised to find out it was the ‘thing’ that is next to the kitchen faucet.  (So, that is what it is and what it’s job is – I learned something new today!)

YouTube video I had found:  https://www.youtube.com/watch?v=rmG2JXQL858


Ours hadn’t been cleaned in a while (per the husband tonight).  The metal part easily pulled off, but the plastic part had hard water build up on it and was difficult to snap the top part off, but I got it.  (I used vinegar / baking soda to help clean some of the crud off.)

drain air gap, dishwasher, repair


I was shocked how much junk was inside of it!  (This photo looks like a bug, but it really was small pieces all stuck together.)

drain air gap, dishwasher, repair


After I cleaned out the ‘drain air gap’ and scooped out all of the dirty water I ran a quick wash and prayed it would not have any dirty water in the bottom when the cycle was finished.  I was doing the happy dance when the bottom of the dishwasher was empty when I opened it!


So, I have done multiple loads of dishes today – I at least knew the blue dishes had not been used lately so they were skipped.  I still have a sink full of dishes, but I am almost back to where I started this morning.

So, I am guessing I saved a couple of hundred dollars and a call to the plumber.

Do you have a Drain Air Gap (sounds like they are not required in all areas)?  When was the last time you cleaned it??

Later – H


Cost of the Master (shower) bathroom upgrade

I was talking to an extended family member the other day about the Master (shower) bathroom upgrade blog post.

Master (shower) bathroom upgrade

and I realized that I didn’t say how much we spent on it.

a) American Standard toilet – about $270 with tax  (we had it delivered to the local Home Depot so we could inspect it before it came home)

b) Toilet Seat – We had already bought the seat for our old toilet in that bathroom.  So, I guess it cost $0.00 for this upgrade.

c) Wax ring – I ordered the one off the Home Depot website at the same time as the toilet.  It was about $6.00

d) Flooring – A box of the flooring costs about $53.00

I will use that amount even though the ‘cost’ of the front bathroom flooring was really twice that since we needed one piece from this box to finish that floor (which really makes this bathroom flooring free).

e) Paint – We had a 1/2 gallon of the paint sitting in the garage so it was good to put some of it to use anyways.  So, the cost of the paint in this remodel was $0.00

So, the total cost for this bathroom upgrade (not counting our time and labor) was about $330.00

I think that was definitely worth it to get a bathroom that saves water, has a new floor and is what we wanted.

Later – H

Master (shower) bathroom upgrade

Since our house is over 20 years old and we are on a well we decided it was time to upgrade the toilet in the Master (shower) bathroom to a low water usage model.  While we were at it we decided to remove the carpeting (it still looked good, but I was so happy to see it go).

bathroom, remodel, old toilet, sponging

A while ago we decided to paint the lower half of our Master (shower) bathroom walls.  At that time I did a Faux finish – one color of solid blue painted and then a darker color sponged over the top.


bathroom, remodel, old toilet, sponging


Knowing that the new toilet had a smaller tank it became obvious that I would have to repaint the wall before the new toilet was installed.


So, instead of going to the work of trying to match colors and sponge marks I decided to just paint the walls and bottom molding a solid blue.

bathroom, remodel, new toilet, new paint


Here is what we changed and what supplies we used.  All items were bought at Home Depot.

Note:  We paid for all the items and supplies we used for this project.

a) Paint (part of a gallon) –  Behr, Fragrant Breeze (semi-gloss, pastel base) – This paint was bought a while ago and it was also used above the Kitchen cabinets.

b) Toilet – American Standard H2Option Dual Flush (1.0 / 1.6 GPF), round front, Bone color.  **The wax ring and toilet seat have to be bought separately.

The builder of our house didn’t believe in large bathrooms so we had to buy a round front toilet for each bathroom (and our shower and bathtub are Bone colored so white wouldn’t work either).  This is the second one of these toilets that we special ordered through Home Depot – the first one was in February 2014 (for the other bathroom) and it works great.

This toilet was definitely not the cheapest one we could have found, but we were looking for one that would meet our needs: Round front, Bone colored and low water usage

c) Flooring – TrafficMaster Allure 12 in x 36 in Sedona Vinyl Tile Flooring (24 sq ft / case)

Since we have ‘smallish’ bathrooms we were able to do both bathroom floors with two cases of this flooring.  Which is good since the first bathroom took one extra piece than one case.  (Really!?!)

d)  I also repainted the bottom molding with the same blue color so they matched the walls.

I am happy how it turned out.  What home remodel project have you worked on lately?

And as a side note, I went  through Southwest Rapid Rewards so I will get points for the dollars we spent at Home Depot.  As an extra bonus I bought Home Depot gift cards at a local Grocery Store so the cost got me extra reward points there also.  Besides that I used our credit card (which gives us a percentage back) to buy the gift cards.  I think that was a triple play!

Later – H


Front bathroom remodel – part one

** Note:  This post was NOT sponsored by any person or company and all opinions are mine. **

We have a 20+ year old house.  A while ago we added wainscoting to the front bathroom (and updated the faucet), but hadn’t made any other major changes in years.

toilet, bathroom, remodel

Original 1980s toilet

Well, between the current drought in Northern Nevada and the toilet having flushing issues we decide it was time to replace the original toilet (that used about 3 gallons per flush) with a new toilet.

You would think this was a pretty easy change, but we had to do some investigating to find a toilet that would fit our requirements:

a) Round bowl – Even though our home was a custom home built on spec (built between customer orders to keep the crew busy) the builder did not believe in large bathrooms.  I know of a few houses in our area that were built by him – I am wondering if we all have small bathrooms (the floor in this bathroom is about 6′ by 6′).

b) Bone colored – Our bathtub and sink are bone colored so a white toilet just wouldn’t look good.

We finally figured out we could order a round bowl, bone colored toilet (that had good reviews) online at Home Depot.  We had the toilet delivered to the local Home Depot store so we could verify that it was in perfect shape before we brought it home.  This is since we had tried to order a round bowl, bone colored toilet from a BIG online place about a year ago.  We had that one delivered to the husband’s work (luckily) since it was shattered when they took it off the deliver truck (it was packaged in only the vendor’s original boxes).  The one delivered to Home Depot was in perfect condition and the original boxes were actually packed inside another box with extra packing!

So, we bought an American Standard H2Option Siphonic 2-piece, dual flush (0.8 GPF or 1.2 GPF) toilet, bone color and round front

Model 2889.216.021

It had 192 reviews and was $256.01 plus tax.

The handy husband installed it about two weeks ago and it works great!  It is really quiet when it flushes and since it uses less water per flush you don’t get burned if someone flushes while you are in the shower (a bonus we didn’t even think about).

dual flush toilet, bathroom remodel

New American Standard Dual Flush toilet

The new toilet tank is physically smaller than the original tank.  We kept the tank of the old toilet since I want try use it in the garden, but the husband smashed the old bowl (took one swing) and the pieces were put in the bottom of a tall planter outside.

In part two of the front bathroom remodel I will show the new flooring we also put in.  (If we were going to the work of replacing the toilet we decided why not change the original vinyl out at the same time.)

What remodeling projects have you taken on lately?

Later – H

** Note:  This post was NOT sponsored by any person or company and all opinions are mine. **